Followers

Saturday, February 20, 2016

The Maryland Line

Who Were These Guys?


Few Americans (sadly) know much about the eight-year American War for Independence. Likewise, few of the war's units have resonated with the public, other than perhaps the Minutemen, Dan Morgan's Rifle Corps, and maybe "Swamp Fox" Francis Marion's partisans. However, at the time, contemporary writers and some members of the public were aware of the exploits of the Continental Line units. These specially formed regiments, drawn from the states by order of Congress, were the closest thing to regulars Washington had to face the highly professional British and Hessians. I intentionally placed my protagonists in the Yankee Doodle Spies series within one of the most renowned units of the American War for Independence - the Maryland Line. With George Washington's birthday upon us, it is fitting to present the story of one of his favorite units of the war.


The Formation of a Fighting Machine


The 1st Maryland Regiment (Smallwood's Regiment) originated with the authorization of a Maryland Battalion of the Maryland State Troops on the 14th of January 1776. It was organized that spring at Baltimore, Maryland (three companies) and Annapolis, Maryland (six companies) under the command of Colonel William Smallwood. The regiment was established with eight line companies (fight shoulder to shoulder) and one light infantry company (fight like Indians) from the northern and western counties of the colony of Maryland.  On 6 July 1776, the Maryland Battalion was assigned to the main Continental Army. On 12 August 1776, it was assigned to Stirling's Brigade and five days later (17 August 1776) adopted into the main Continental Army. The regiment was well-equipped and was one of the few American units to have bayonets, a key factor in its later performance. The regiment was also well trained and disciplined. Arguably the best outfit in the Continental Army at the time.


William Smallwood


Laurels on Long Island


The Maryland Regiment had joined the Continental Army barely two weeks before the Battle of Long Island. When the British under Cornwallis surprised the Americans by circling around their rear, Stirling ordered all forces, other than the Marylanders, who were outside the fortified position on Brooklyn Heights, to retreat there, leaving behind himself and four companies of the 1st Maryland and Haslett's Delaware Regiment.  Stirling led these men against Cornwallis' 2,000 British soldiers who were massed around the Old Stone House, a thick-walled field-stone and brick.


Long Island


The Marylanders charged the British forces six times to give their comrades time to make their way to safety with the rest of Washington's army in the Heights. Twice, they managed to drive the British from the house, but as more British reinforcements arrived and the Marylanders' casualties mounted, they finally had to give up the assault and try to get to safety themselves. “Good God, what brave fellows I must this day lose,” Washington remarked to Israel Putnam as he witnessed the Marylanders repeatedly charge Cortelyou House, effectively holding back the British advance. Later, Washington described their efforts as an "hour more precious to American liberty than any other."

Only Major Mordecai Gist and nine others managed to reach the American lines. Note and spoiler alert - this is a critical scene in The Patriot Spy, where Lieutenant Jeremiah Creed leads some of his men and Gist to safety. Washington witnessing this fighting withdrawal gets Creed assigned to special intelligence missions.


Mordecai Gist


Back to the story: Of the others, 256 lay dead in front of the Old Stone House, and more than 100 were wounded/and or captured. The dead patriots were buried in a mass grave consisting of six trenches in a farm field. The result of the brief battle was a hard blow for the Americans. More than a thousand men were killed, captured, or missing. Generals Stirling and Sullivan were  British prisoners of war. The battalion had lost more than 250 of their number. Most of the Marylanders' casualties occurred in the retreat and desperate covering action at the Cortelyou House. Ultimately, of the original Maryland 400 muster, 96 returned, with only 35 fit for duty. As few troops would stand and fight in the face of England’s battle-tested professional army, the fact that the Maryland Line functioned and operated as a disciplined unit was not lost on Washington.


Apres Brooklyn


After reorganization and reconstitution, the Maryland regiment won more laurels in the desperate actions that followed against numerically superior British forces at White Plains (October 28, 1776), where they faced Colonel Johann Von Rall's Hessians. From 10 December 1776 to January 1777, the regiment was assigned to General Hugh Mercer's Brigade.


Trenton


During the critical winter "that tried men's souls," the regiment, though much reduced in size, was at the forefront of the fighting at Trenton (December 26, 1776) and Princeton (January 3, 1777). The following year, the re-designated 1st Maryland helped defend Pennsylvania and fought at Brandywine (September 11, 1777) and Germantown (October 4, 1777).


Germantown


The battle-worn survivors of this regiment ostensibly reorganized in December 1777, continuing their enlistments “for three years or during the war.” But by the close of 1777, few remained from the original line Washington witnessed at Long Island. Bled weak by fighting in the vanguard of the war, they received reinforcements from the Maryland companies of the Flying Camp. They earned recognition for their sacrifices by a nickname bestowed by General Washington himself, "The Old Line."


Moving South


Cowpens
In 1780, the Maryland Line (the first two battalions) reorganized as the first and second Maryland and became the backbone of the Southern Department. They provided a solid cadre of "regulars" around which various militia units could rally. At the disastrous Battle of Camden, SC  (August 16, 1780), the second Maryland served on the army's flank under General De Kalb while the first Maryland formed the army's reserve under General Horatio Gates  When General Nathanael Greene was sent south to relieve the disgraced Gates, the Maryland Line served with distinction in several battles. At the end of the decisive victory at the Battle of Cowpens (17 January 1781), the Maryland Line (the 2nd Maryland) held the center of General Daniel Morgan's command. The Maryland Line also served at Guilford Court House, NC (15 March 1781), where Greene tried to stop Lord Cornwallis's invasion of that state. Although a technical loss, the Americans put up a fight and inflicted unacceptable losses on the British, making it a Pyrrhic victory.


Guilford Court House


A Faded Legacy of Honor


After the war, many members of the Maryland Line continued to maintain relationships formed during the long struggle for independence. In the last days of the war, the Society of the Cincinnati formed chapters in each of the thirteen original states. William Smallwood called for the first assembly of the Maryland Society of the Cincinnati on 20 November 1783 and Smallwood and Mordecai Gist became the first officers of the Maryland chapter of the society, which consisted entirely of officers of the Maryland Line. One of the express purposes of the society was to foster fraternal camaraderie and honor their collective military history. Effectively meeting for reunions as long as there were survivors, the first members of the Cincinnati likely cultivated and propagated the story of the old line. As the revolutionary generation dwindled, perhaps the first “greatest generation” in American history, so faded the memory of gallant service and sacrifice. Unfortunately, this would become the case for the follow-on patriots of the 19th, 20th, and 21st centuries.
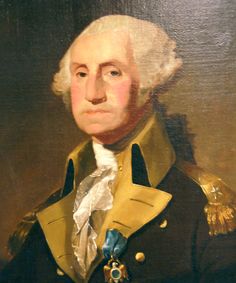


Washington was the first National President of
The Society of the Cincinnati


Sunday, January 24, 2016

Quinton Bridge

A Second Forage War


Mad Anthony Wayne


The winter of 1777-1778 was especially tough for the Americans, but both sides often sent out significant forces to forage for their own troops and to disrupt the other's foraging efforts. On February 19th, 1778, with the Continental Army desperately needing supplies, Brigadier General "Mad" Anthony Wayne led a force across the Delaware River south of Philadelphia on a foraging mission through southern New Jersey. General Howe responded by sending about 4,000 men to disrupt Wayne. However, Wayne moved quickly north, collecting provisions, forcing residents to move supplies he couldn't take, and occasionally skirmishing with the British pursuing him. Howe sent another force in March under Lieutenant Colonel Charles Mawhood to forage and try to force Wayne into a fight.


Lord Howe


Simcoe


British Move into the Jerseys


On March 17th, Mawhood led a force of 1,200 British regulars and Loyalist companies of the New Jersey Volunteers, along with John Graves Simcoe's Queen's Rangers, across the Delaware River into Salem County, New Jersey. Scouts alerted Wayne to the British movement. He had finished his work and was preparing to return to the Continental Army encampment at Valley Forge.


19th Century Map of Salem Co.


Americans Defend


Alloway Creek in Salem County served as a natural line of defense. The local militia, who were very active in NJ, quickly established strong defensive positions at the two crossings nearest the Delaware River—Quinton's Bridge and Hancock's Bridge—after learning of the British movement, to prevent crossing attempts. Mawhood led his force to Salem, where they were met by local Loyalists who informed them that Colonel Benjamin Holmes, along with 300 militia, was at Quinton's Bridge, only three miles (4.8 km) to the southeast. Holmes had positioned his forces on the north side of the bridge and had taken up the bridge's planking to block easy passage.


The Militia had good positions along  the creek

Ruse de Guerre


Before dawn on March 18th, Mawhood moved several detachments of men into position on the side of the creek opposite the American forces. Captain William Smith was the senior officer with 300 local militiamen under his command defending the area around Quinton Bridge. Mawhood realized the rebels held strong defensive positions behind the creek, so he devised a plan to draw out the patriots. Under cover of darkness, the British concealed small detachments of the 17th and Simcoe's Rangers in and around Weatherby's Tavern on the Salem side of the creek, just northeast of the road. On the morning of the 18th, Mawhood baited his trap by ordering an element of the 17th Foot to stage a retreat toward Salem.


Simcoe's Queen's Rangers


Punked Patriots


The rebels fell for the trap. Captain Smith left one-third of his troops to defend the defenses while he led about 200 men across the creek in what turned into a chaotic chase. Without proper flank security, the militiamen headed up the road past the tavern. When they had gone roughly two hundred yards beyond the bridge, the British and Loyalists opened fire from all directions. Surrounded by a hail of musket balls from the front, sides, and back, they panicked and ran toward the creek for safety. However, they left around 40 of their comrades dead in the crossfire. Additionally, some of the fleeing patriots drowned trying to cross the creek. One patriot, Andrew Bacon, risked the


Smith's Militia Retreating (Rare color photo!)

Frustrated British


By that time, help arrived in the form of Colonel Elijah Hand's militia and two cannons. They reinforced the south side of the creek. Frustrated, Mawhood pulled back his forces and moved on to another objective—Hancock's Bridge—before ultimately returning to Philadelphia. The engagement at Quinton's Bridge was small but typical of the war. There was no clear winner or loser. The significant loss of lives was balanced by the quick reinforcement of the creek and Mawhood's decision to seek his luck elsewhere.

Sunday, January 10, 2016

The Patriot Seaman

A Strategy of Sorts


The American Revolution was intensely complex. It started as a political movement and then turned into an armed uprising that developed into a war for independence, along with aspects of a civil war, a secret war, and ultimately a global conflict. But it was also an economic war. The British aimed to control and shut down American commerce, which was the colonies' vital lifeline. In some ways, British actions during the ten years leading up to Lexington and Concord were about gaining the most from the colonies without letting them become too wealthy, large, or influential. Some in Parliament and British leadership worried that someday the American colonies would surpass Britain in population, strength, and reputation. How right they were! Yet, instead of figuring out how to benefit from this, they tried to prevent it.


Down to the Sea in Ships


When war broke out, the British strategy involved surrounding the Americans with Indian and Canadian allies to the west and north. The east and south would be handled by the Royal Navy. So, a naval war became the less discussed but equally important, if not more so, than the land war. Great Britain had the largest and most powerful navy in the world, while the American colonies had none. America did have a growing and capable merchant marine, along with the raw materials to build ships. As a result, it began creating its own small navy and converting its merchant ships into privateers and naval vessels. This success was only possible thanks to the brave and determined men who sailed the ships and the resourceful, resolute men who captained them. This is one such captain's story.


A Navy Built from Merchantmen


Connecticut Navy


Seth Harding was born in Eastham, Massachusetts, although he moved to Norwich, Connecticut, when he was a young man. Harding went to sea early in his life and commanded several merchant ships during the French and Indian War. By 1771, he had moved to Liverpool, Nova Scotia. At the start of the American Revolution in 1775, he returned to Connecticut and offered his services to its nascent navy. Harding was commissioned as commander of the state brig, Defence. Harding captured many British ships while in command of this vessel and two others. He was first sent on patrol near Boston Harbor, where on June 12, 1775, he captured the British armed transport ship, George. Along with the ship, he took several hundred Scottish soldiers of the 71st Highland Regiment and their commander, Lieutenant Colonel Archibald Campbell.


Naval Actions Were Small


Most American actions, including Harding's, were small-scale but still played a vital role in the war. Here is a contemporary letter that mentions one of Harding's exploits:

FAIRFIELD, MAY 13, 1776.

More Tory business. Last Sunday Captain Harding, in the brig Defence, had the happiness of taking a number of Tories who were crossing over to Long Island, on some of their pious errands, I suppose; among whom was one McNeal, a wretch you have often seen up town. He generally wore a white hat and blue silk jacket; in exchange for which, I hope, they will give him a coat-of-mail, that is, one of lime and stone.

It is said there were a number of letters found on them, giving an account of their diabolical schemes, together with the names of several of their associates. In consequence of which, a number of gentlemen resolved to break up the den, and set off to Ridgefield; among whom was the bold asserter of his country's cause, Major Dimon, who, I have this moment heard, had like to have lost his life, in reposing too much confidence in one of the villains. It seems he was very active in taking one Lyons, who, after he had surrendered, invited him in, where he had a number of the brother murderers concealed, that fell on him and would have put an end to his life, had not some of his friends very providentially come to his assistance. The Major, I am told, is much wounded in the head, but still had resolution to go in quest of the others.

You shall hear further in my next.


During his service with Connecticut's navy, Harding actually commanded two brigs named Defence and   Oliver Cromwell. His success led to bigger and better things.


John Jay

Continental Navy


In September 1778, Harding accepted a Continental Navy commission and took command of a new 32-gun frigate, Confederacy. In 1779, he sailed along the East Coast with two other ships, Boston and Deane, capturing three prizes and performing convoy duties. His ship was undermanned, so he had to impress several French prisoners being exchanged by the British. During this cruise, the American flotilla captured a British privateer, Pole, and a schooner, Patsey, in addition to several merchant vessels. Overall, good work. In September of that year, Harding was instructed to take John Jay, the newly appointed American Minister to Spain, to Europe, but a tremendous Atlantic storm struck them, and the ship was dismasted 10 days out. Harding, through skillful seamanship, sailed his ship to Martinique for repairs, while his passengers continued on another vessel.


Continental Navy


"The Harding" goes to Work


Once repaired, Harding got back to work. Confederacy raided British merchant ships and protected convoys until April 18, 1781, when, at the Delaware Capes, she had to surrender to two British ships, the 44-gun Roebuck and 32-gun Orpheus. In early 1782, Harding was exchanged. He then commanded the privateer Diana, but was captured again near Jamaica. And once more, he was released. This was fairly common. Wanting more action, Harding volunteered to serve as First Lieutenant to famous American naval Captain John Barry on the Alliance. In October 1783, Harding was wounded during the final battle of the war, fighting off the coast of France against HMS Sybill. By then, Harding had gained a reputation, especially in France, where he was held in high regard. The King of France, Louis XVI, called him "the Harding."


John Barry


Back to the Merchant Navy


After the war, Harding returned to the merchant marine, sailing and trading in the Virgin Islands. He even became a Danish citizen to improve his business opportunities there. By 1786, Harding's war wounds had weakened him enough to retire, and he first settled in New York City. Clearly, New York drained his resources, and over time, he sank into poverty. In 1807, Congress granted him a pension. The fighting merchantman died in Schoharie, New York, in November 1814. Harding's talents and achievements reflect the young American navy and merchant marine, which played vital roles in securing independence, peace, and prosperity for the young nation.


The World War I vintage USS Harding, DD-91, is named after this fighting first-patriot...


Saturday, December 19, 2015

The Taking of Pelham 1 7 7 6

Readers of The Cavalier Spy might recall some of the maneuvers by the British commander-in-chief, Lord William Howe, as he tried to trap George Washington's forces near Kingsbridge (the Bronx). This led to a series of battles and skirmishes in the New York campaign, which could have crushed the spirit of '76. The small engagement at Pells Point, or Pelham, was one of these minor but strategically important fights.


An Excellent Plan:


In the summer of 1776, the British and their Hessian (German) allies defeated Washington’s forces in Brooklyn and Manhattan. However, Washington’s ability to organize timely retreats and General Howe’s reluctance to aggressively pursue the rebels prevented total destruction. In September, the Continental Army was holding defensive positions at Harlem Heights on the northern tip of Manhattan, with the British army in front and the Royal Navy (under Howe's brother Richard) controlling the North (Hudson) and East Rivers. But the Continental Army's Harlem defenses were strong, so in mid-October, Howe attempted a flanking move by water, taking advantage of the Royal Navy's dominance. His goal was to cut across Westchester County and trap the Americans.


A Clever Strategy:


Leaving behind a holding force in Manhattan, Howe moved about 4,000 troops, mostly Hessians, up the East River toward Long Island Sound for a landing at Throg’s Neck, which is now part of the Bronx. Howe’s objective was to cut off the American supply line to Connecticut, and the British commander also hoped to lure Washington into a major battle or to crush the Americans from the right flank while the holding force launched a frontal attack. Intelligence reports warned General Washington that the enemy was surrounding him with a naval landing at his rear. In desperation, the besieged American commander-in-chief positioned the few forces available along strategic points. The numerous stone fences and marshy ground made the British approach challenging and his position defensible. However, he realized that a determined British effort was likely to succeed. Additionally, they might have been planning other landings as well.

Prelude at the Neck:


General Clinton
On October 12, the British landing force under General Henry Clinton landed under the cover of fog at Throg’s Neck, a marshy peninsula that was not part of the mainland. There were only two ways to reach the mainland: a causeway and bridge at the lower end, and a ford at the other. The Americans guarded both. American Colonel Edward Hand and a detachment of 25 men from the 1st Pennsylvania Regiment were determined to slow the British until help could arrive. The brave Pennsylvanians tore the planks from the bridge and took position behind a stack of cordwood lining the causeway. Checking flints and powder, each man took a good firing stance and waited. At last, the British arrived. The Pennsylvanians' accurate musket fire startled the advancing British troops. Puffs of smoke, the crack of muskets, and the zing of lead balls had their effect. The British frontline retreated and tried to cross at the ford to bypass the rebels, but they faced another group of defenders. Soon, both American defense points were reinforced, bringing the total American forces to more than 1,800. Howe wisely decided it would be better to retreat and land elsewhere. While the Americans had the advantage of position and interior lines, they also had the advantage of mass and maneuver. The British camped on Throg’s Neck and stayed there for six days while supplies and reinforcements, including 7,000 Hessian soldiers under Gen. Wilhelm von Knyphausen, arrived from New York. When he was confident his force was ready, Howe ordered the move. To surprise the enemy tactically, they moved at night. Just after midnight on October 18, Howe launched his army again and landed at Pell's Point, near Pelham, a few miles north. Maneuvering by sea provided a huge advantage when you control the waters, as the British did.


Taking of Pelham:


The British landed at dawn, with General Clinton commanding the operation. His forward unit of 4,000 British light infantry and Hessian Jägers led the way. Near Eastchester, waiting for them, was a 750-strong brigade led by Massachusetts Colonel John Glover. (Note: Glover is a minor but important character in the first two books of the Yankee Doodle Spies series.) Glover himself spotted the British landing from atop a hill overlooking the coast. He requested orders from his immediate commander, General Charles Lee. Lee, Washington's second in command (and also a key figure in the second book of the Yankee Doodle Spies, The Cavalier Spy), however, gave no orders. Recognizing that the narrow causeways and inlets favored a defensive stand, Glover, the resolute Yankee he was, decided to act on his own. He ordered his brigade into action, consisting of the 14th, 13th, 3rd, and the 26th Massachusetts Continental Regiments. 


Continental Line Infantry


Glover held 150 Continentals in reserve. His force soon engaged enemy skirmishers. Glover deployed his Marblehead Regiment (former seamen) at the front. At Breed's Hill, Glover had seen the carnage caused when the British advanced in ranks against well-positioned infantry. He sent a company forward as an advance guard to keep the British in check. This allowed him time to prepare a defense before the expected assault. Glover arranged a series of ambushes by placing his forces in staggered positions. They cleverly used the stone walls lining each side of the lane that led from the beach inland. His orders were to hold as long as possible and then fall back to a rear position, with the next unit doing the same. Glover planned a classic fighting withdrawal to delay the enemy's progress. He positioned himself with his advance guard. The Marbleheaders opened fire on the advancing British. The sound of muskets and puffs of smoke to the front caused the British to pause. Once again, heavy lead balls zinged past the advance guard, which quickly deployed and returned fire. Volleys were exchanged, and for a time, the Americans held the enemy's advance.  

When the British called for reinforcements, Glover's men withdrew in good order. Seeing the Americans retreating, the British fixed bayonets and advanced. But 200 troops of the 13th Massachusetts Continentals waited anxiously behind the next stone wall. On command, the Americans rose and fired a devastating volley into the British at 30 yards - point-blank range. Surprised, the British column suffered heavy losses and retreated to the main body of the invading army.


Glover's Marblehead Regiment in action at Pelham


Not to be denied, the British reorganized and attacked again with all 4,000 men and seven cannons. They bombarded the Continentals behind the stone wall. Under cover of artillery fire, the infantry launched its attack. Most British shells fell short or flew high, and the few that hit the stone walls caused little damage. The bombardment had little effect. Prepared, the Americans unleashed another deadly volley on the advancing infantry at 50 yards. This time, the British responded with volley after volley. The firefight lasted a full 20 minutes. Finally, British artillery moved closer in support, and this time, their fire was effective. Under pressure from combined arms, the lead American regiment fell back. The next regiment provided strong covering fire to keep the British at bay until their allies could retreat. The British then turned to attack the position of the 3rd Continentals, stationed behind a stone wall on the other side of the road. Both sides kept firing steadily. The British advanced several times, but each time, American fire broke their lines.

 However, the British's superior numbers eventually began to overpower the Americans. Realizing this, Glover pulled the regiment back to another stone wall atop a hill. The next regiment in line, the 26th Continentals, soon engaged the advancing enemy. Once more, using the cover of a stone wall, the 26th fired one last volley before Glover ordered a retreat. Moving in good order, Glover's brigade crossed a bridge over the Hutchinson River. Glover left a rearguard of 150 men from the 14th Massachusetts Continentals to cover them. True to form, Howe chose not to exploit the situation. He camped his forces on a hill on the opposite side of the stream but made no attempt to cross. This allowed Glover to pull his brigade back to Yonkers.


Glover's smartly executed defensive withdrawal
was as classic as the British amphibious tactics


What was the (Pell's) Point?


With the British advance delayed, Washington left a small garrison at the fort on the heights that bears his name and safely evacuated the main American army north through Kingsbridge to Westchester. Howe's army slowly moved through New Rochelle and Scarsdale. This marked the beginning of the Battle of White Plains. The series of skirmishes resulted in relatively few casualties for both sides. However, the clever American actions at Throg's Neck and Pelham bought Washington time to prevent his army from almost certain entrapment. A war of posts would soon evolve into a war of movement.

Author's comment:  

People who live in or are familiar with the New York area might be amused to see famous place names where they have lived, worked, or commuted mentioned as part of a great military campaign and one for the life of the nation at that. Our First Patriots had no idea that the swampy lowlands and rugged uplands of the Bronx and Westchester, where they fought, would become part of arguably the greatest metropolis in the world. What neighborhoods and byways are today are also hallowed ground. We should never forget that.


Sunday, November 29, 2015

The Surgeon Counterinsurgent

The cause of the American Revolution was a conflict between two motives: one for independence from Britain and its monarchy, and the other for continued allegiance to that same monarchy as part of the larger British "empire" that grew in the 18th century. The Loyalists often get a bad reputation. They were not evil, misguided, or any more treacherous than the patriots overall. They were simply traditional folks who saw greater benefits in remaining under the crown than in rejecting it. In the long lead-up to the War for Independence, many tried to steer the politics of their respective colonies toward resolving their grievances.


Political agitation caused some to  remain ambivalent


But by the outbreak of actual hostilities, Loyalists were forced to go underground (keep their sympathies secret) or assert royal prerogative through action. New Jersey was the most divided of all the states in this regard. Many influential Loyalists had participated in the various committees, associations, and even Congress to guide the disaffected toward a political solution. But once the challenge was made, they began to slip away quietly or suddenly to action.


Loyalists organized for the day the British would arrive


One such "First Loyalist" was a little-known doctor from Teaneck, New Jersey, in divided Bergen County, named Abraham Van Buskirk. Van Buskirk was a notable figure in the region. The Van Buskirk family was an old Dutch family that had lived there for many years. His father, Lawrence Van Buskirk, operated a successful stagecoach service. By the time of the war, the elder Van Buskirk had passed the enterprise, called The Flying Machine, to his son Andrew, who managed the stage to the Hoboken Ferry. He also ran a tavern in New Bridge.

Doctor Abraham occasionally helped out, usually making the run to Paulus Hook. Van Buskirk and his family were well established in the area. His travels on the stage and familiarity with the region would later prove useful. Abraham Van Buskirk and many other prominent New Jersey Dutch failed in their political efforts to keep the colony aligned with the crown. Additionally, they secretly took other measures as the cloud of war gathered over the troubled Royal Colony.

Despite his Tory leanings, Van Buskirk became an officer in the county militia. However, many local patriots were skeptical and saw him as a Loyalist. He had been associated with the patriot cause early on, having been elected as a moderate to the county committee and provincial congress. Van Buskirk managed to dodge accusations so skillfully that he appeared more like a patriot. But he was a man of principles; he broke ranks with the patriots over the issue of outright independence for the thirteen colonies, refusing to swear the oath of abjuration, renouncing his loyalty to the Crown, and resigning from the provincial congress. Yet, in his practical Dutch way, Van Buskirk and his fellow secret Loyalists would only openly declare if the British showed up in loco. Fortunately for them, and unfortunately for the patriots, they did not have to wait long.


Cornwallis's Invasion of the Jerseys


During late summer and into the fall of 1776, the people of Jersey waited anxiously as the British, under Lord William Howe, systematically drove Washington and his Continental Army from Staten Island, Long Island, and the Island of New York (Manhattan). After an inconclusive battle at White Plains (in Westchester), Washington moved most of his forces across the North (Hudson) River to the "safety" of the Jerseys.

In November, British General Lord Cornwallis led a force of 5,000 men up the palisades overlooking the Hudson River and forced the Continental Army into a hasty retreat toward Pennsylvania. Now was Van Buskirk's moment! On November 22, the British crossed the Hackensack River and captured the city. Swarms of Hessians dazzled or terrified residents, depending on their allegiance. The Volunteer Loyalists gathered in town. He and his men could openly declare and organize their unit, the 4th Battalion, New Jersey Volunteers. Van Buskirk, the citizen, soon proved himself as a capable military leader, guiding his unit with a steady hand and determined efficiency.

Loyalist Infantry

The War for Independence was fought fiercely at the local level, especially between Loyalists and rebels. Some of the most intense fighting took place in the Hackensack Valley. To support British efforts to control Jersey, Van Buskirk began sending his men on raids across Bergen County and later patrolling key areas like Bergen Neck and Staten Island. Van Buskirk's patrols captured prisoners for questioning or exchange. They foraged from the local people’s resources, just like the patriots did. They engaged in numerous skirmishes with the hated rebel militia and sometimes with Continental troops. Van Buskirk quickly became a terror to Hackensack Valley patriots and any Continental units passing through the area.

After Washington's surprise victory at Trenton, many British units left New Jersey, but a few stayed near Paulhus Hook and Bergen. From there, Van Buskirk's companies launched more raids into the so-called "neutral ground" of the valley. They played a part in the "Winter War" (or Forage War), helping to safeguard farmers trying to supply goods to the British forces concentrated in New York. Throughout 1777, Van Buskirk effectively waged unconventional warfare from his base at Bergen Point, sending operatives as far as the New York border to capture patriots for interrogation and retaliation.


In September 1777, the British commander in New York, General Clinton, launched a three-pronged, 2,000-man assault into New Jersey. Van Buskirk's men participated eagerly, landing at Elizabeth Town and moving quickly north, where they performed well during an engagement at Passaic. In August of that year, American General John Sullivan started an attack on British and Loyalist forces on Staten Island. Abraham Van Buskirk's battalion was part of Brigadier General Cortland Skinner's Loyalist Brigade.


Patrick Ferguson

In May 1779, Van Buskirk supported a British raid on Closter with the aim of reaching Paramus. Captain Patrick Ferguson, who would later gain fame for King's Mountain, played a key role in the operation. Later that year, Van Buskirk foiled local patriots in another way by escaping Light Horse Harry Lee's raid on Paulhus Hook, where he was among the intended targets. Van Buskirk's intelligence network was now well-established in that part of New Jersey, and it made a real difference.


The winter of 1779-80 was exceptionally cold. Van Buskirk's 4th New Jersey was based on Staten Island. Conditions would soon warm up. On January 14, American General Lord Stirling attempted a raid against Van Buskirk but was ultimately unsuccessful. Undeterred, Van Buskirk launched a counter-attack on January 25, capturing 50 prisoners despite the severe cold affecting both sides. In April of that year, Van Buskirk played a leading role in the Battle of Hooperstown.


In September 1781, Van Buskirk led his battalion during the turncoat Benedict Arnold's infamous burning of New London and the siege at Fort Griswold, where the surrendering fort commander, Colonel Ledyard, was infamously stabbed and many of his men were bayoneted to death. The last action of the war in the North somewhat symbolizes the true nature of the desperate struggle for America.

Benedict Arnold: British general


The action in Connecticut in 1781 was one of the last major engagements in the North. Following the lengthy negotiations after Yorktown in October 1781, the war returned to a state of "low intensity." One can imagine Van Buskirk played his part skillfully until the end. After the war, Van Buskirk's fate was no different from that of many other Loyalists whose dreams were shattered and whose homes were destroyed or seized by vengeful rebels. Someone as dedicated to the crown as Van Buskirk had few options. As a result, the surgeon, businessman, politician, and soldier joined many other Loyalists who emigrated to Nova Scotia. There, he settled in Shelburne, where he died in 1791.


Saturday, October 31, 2015

George Washington, Vampire Slayer!

Excuse the Halloween hyperbole, but now that I have your attention, I can discuss hauntings during the time of the Yankee Doodle Spies. Truth be told, if I had started the action and adventure series with a book titled, say, "The Marching Dead," I would be on easy street today. People enjoy being scared, and they prefer the macabre and horrifying over mundane things like action and intrigue. Just imagine, a tale of a rebel unit massacred while bivouacking at a cemetery. Only this unit of wraiths rises, zombie-like, whenever the Cause needs them. Still imagine a team of clever British officers desperately trying to find a way to stop this phantom army's onslaught, not realizing that silver, not lead balls, would do the trick... What's in your ammo box?


Greenwood Cemetery in Brooklyn, New York


The American Revolution has its fair share of hauntings and spooky stories. Most of these are known only locally, as most hauntings are celebrated in their own communities. Many are tied to specific places... like a Poltergeist-like phenomenon. But one legend has become a national story: Sleepy Hollow by Washington Irving. The original story of Ichabod Crane, the superstitious schoolteacher afraid of the legendary headless horseman of the Old Dutch Church, has haunted both young and old for generations. I remember driving through the story's setting, Tarrytown, New York, with my father when I was a boy. I was about ten. As we drove south on NY 9, he pointed to the church and cemetery and said, "the Headless Horseman of Sleepy Hollow is here, the Hessian's ghost haunts the cemetery," and I felt a chill run down my spine. It was broad daylight in summer. Can you imagine how I'd feel on a dark October night? I don’t think I knew what a Hessian was back then, but he had me at Headless Horseman. Over time, the story grew as new media brought it to wider audiences and stretched the original plot to its limits. It’s been adapted into radio shows, TV dramas, cartoons, and recently a major film (featuring Johnny Depp) as well as a TV series that takes the story even further.


The Headless Horseman is the iconic RevWar Spook


Ringwood Manor
The Mid-Atlantic is full of Revolutionary War hauntings. In a past Yankee Doodle Spies Blog, I discussed the Morris-Jumel House in New York's Harlem and the stories and tales of its haunting. The Van Cortlandt Mansion, Greenwood Cemetery (ground zero for the Battle of Long Island - a place that saw the most bloodshed of the war), are other notable New York sites. Just across the great North River, in Passaic, New Jersey, stands Ringwood Manor. 


This was once the home of General Robert Erskine, who was the geographer for George Washington's army. Later, he ran an ironworks on the property. He's buried near the manor house, and it's said that at dusk, he sits on his grave, gazing at the pond beyond. Some have reported his ghost walking the grounds, carrying a lantern. There are also French soldiers buried nearby, who fought for the American cause. They, too, emerge at night and walk along the pond, speaking in French. The house itself is not the original, but it has its own hauntings dating back to the 19th century.


Erskine's ghost haunts Ringwood Cemetery


New England Nightmare


New England, home of the Salem witch trials a century earlier, is no stranger to tales of the macabre. Boston Harbor’s scenic Long Island is known for one of the most tragic Boston ghost stories. At the end of the American Revolution's actions around Boston, the British still had several ships in the harbor, mainly to evacuate Loyal Americans who wanted to leave before the rebels took control of the city. Onboard one of these ships were William and Mary Burton. The young couple, passionate Loyalists, were among those fleeing. While sailing away from the harbor, a shot from the besiegers' battery on Long Island struck Mary in the back of the head.


Mary Burton's ghost roams
 Long Island Dunes


According to the legend, she lingered for several days in excruciating pain before dying. In her death throes, Mary supposedly asked her husband not to bury her at sea. After she died, William
returned to Long Island to fulfill his love's dying wish.

He wrapped her bloodied body in a red blanket that Mary owned and buried her beneath the island's sand dunes. Her headstone was a piece of driftwood carved with her name. Before leaving her
grave, William swore he would return someday with a proper headstone. He never did. But according to
the legend, Mary still waits for him.

Over the years, visitors to the island have reported seeing a woman with pallid skin, covered in mud,
wearing a scarlet cloak, walking among the dunes. Many have seen blood on her cloak and noticed a
gaping hole in the back of her head, where cannon fire had struck her skull.

Southern Spooks


The South is no stranger to incredible stories, and RevWar hauntings are no exception. The focal point is the site of a major war event, Yorktown, Virginia. In October 1781, a desperate British General, Charles Cornwallis, led his troops hoping the Royal Navy would rescue him from land now swarming with rebel soldiers and their French allies. Prolonged sieges under harsh conditions set the stage for eerie stories that still persist today. 

The anguish and suffering during the siege make Yorktown hauntingly memorable. From “Cornwallis’s Cave on the banks of the York River to Crawford Road – the town is filled with urban legends and ghost stories. Cornwallis’ Cave has no direct connection to Cornwallis, but legend says British troops hid in the cave to escape the constant bombardment by Continental and French artillery.


Cornwallis's Cave


Some legends suggest that the civilian residents of Yorktown took refuge there. Evidence does show that after the war, the cave was probably used by smugglers. It is located along the waterfront. Perhaps they spread haunting tales to keep prying eyes away from their lair? There are still reports that voices can be heard at night emanating from the dark recesses of the cave. Those who follow such stories believe them to be the voices of Revolutionary War soldiers, the moaning of the injured and dying hiding inside.

Myths are to cultures what dreams are to people. Similarly, horror stories are to cultures what nightmares are to individuals. The eight-year war for independence was a nightmare for everyone involved: the Americans who suffered during the rebellion; the Loyalists who lost their homes and property; and the British who lost their empire. It’s perhaps fitting that such a war serves as both a source of myth and horror. Have a spooky Halloween. Stay frightened, my friends.


Saturday, October 3, 2015

Fort William and Mary

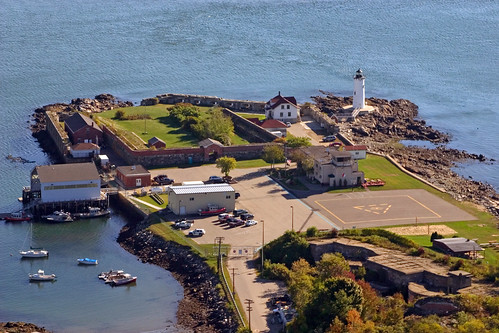
The scenic town of New Castle, New Hampshire, is home to the ruins of Fort William and Mary. Similar to the college in Virginia, the fort was named in honor of the somewhat iconic British rulers associated with the Glorious Revolution. It's ironic that each played a role in establishing the British monarchy in America under the guise of a revolution. However, some argue that the first armed resistance to royal authority started here long before Lexington and Concord.


The Agitation


Royal Governor Wentworth
In May 1774, the closing of Boston's port greatly angered most New Englanders. British authorities insisted that the "salt-water tea" be paid for and forced Bostonians to accept this. In New Hampshire, the Committee of Correspondence vowed to make Boston's fight their own. Royal Governor John Wentworth recognized a radical shift in public opinion and saw a possible threat to Royal authority. He attempted to establish a garrison at his only military post, Fort William and Mary in New Castle. However, the Assembly, now hostile to the British, approved only 200 pounds for the effort. Wentworth appointed an officer and three men to run the fort, showing the King's authority. But the army was too small to prevent a revolution.


The Politics

The Assembly was not deterred by Wentworth's measures. Later that month, they voted to create a second Committee of Correspondence. Wentworth and the Rockingham County sheriff tried to intimidate and shut down the Assembly, dismissing them from the chamber for holding an unlawful meeting. Unfazed, they went to a local tavern, and in that friendly setting, they made plans for a Provincial Congress to be held in Exeter in July. Over the next few months, the situation around Boston escalated from simmering to boiling, and the impact spread across New England like wildfire.


The Action

On December 13th, 1774, Paul Revere rode south to Portsmouth to report the British ban on importing military supplies and that rumors about expected British troops were the worst kind: true rumors. John Sullivan, a Patriot leader and firebrand, just returned from the First Continental Congress, decided to take action. Along with local Patriot merchant John Langdon, he vowed to seize the symbol of Royal authority sitting right under their noses at New Castle. On the 14th, Langdon made his way through Portsmouth with a drummer leading the charge. Once he had gathered a crowd, he addressed them. 

About 400 people joined him, forming a mob that set out to take the powder from the fort. A single volley fired from the fort was answered by some shots from the crowd, but no one was injured. They surged into the fort quickly. Breaking into the magazine, they took about 100 barrels of gunpowder. Overwhelmed, the fort's commandant, Captain John Cochran, quickly surrendered his four-man garrison. This marks Fort William and Mary as one of the first locations of overt action in the American struggle for independence. Some compared it to Lexington and Concord, but because there was no bloodshed, it is less well-known. Still, it was the first organized resistance to the King.


Fort William and Mary 1704


The Take

The following day, John Sullivan led more rebel forces now pouring in from across the colony. They first surrounded the governor's residence, but violence was avoided there, as Wentworth complied with their demands. That evening, December 15th, they returned to the fort and seized all the arms and supplies, including some cannons. This action resulted in the Americans capturing some loot, a tangible gain. This included about sixty muskets, sixteen cannons, and one hundred barrels of valuable powder. The gunpowder was quickly transported inland and distributed among various armed groups in New Hampshire. Some of it may have reached the Patriots around Boston. In a land starved for ammunition, this was a small treasure desperately needed.


Gunpowder from the fort moved inland over ice


The Place

History revolves around a sense of time, people, and place. On a scenic promontory overlooking the ocean, a colonial community driven by perceived injustice left their mark. New Castle is a charming town with about 900 residents. It is also the smallest and easternmost town in the state. Its narrow streets are lined with colonial-style houses. The fort was built in the early 18th century on the site of an earlier fort designed to deter pirates. Its main landmark is the Fort Point Lighthouse, built in 1877 on the site of an earlier lighthouse from 1771. Before the latter was built, the only navigational aid for the rocky harbor was a lantern hung high on Fort William and Mary.


Site of Fort William and Mary today